Binding a Sensor
Goal
The goal for this post is to do a bench test where a reed sensor value is read via an openHAB Binding
What you need
- A Raspberry Pi
- An openHAB Sitemap configured according to the previous post
- A reed sensor, a breadboard (optional), and some wiring
What is a Binding?
Items can be bound to Bindings. Bindings allow for Items to read or write to external entities. In this post we will use the GPIO binding, which will allow openHAB to access the GPIO (General Purpose Input/Output) pins on the Raspberr Pi.
Bench testing our sensor
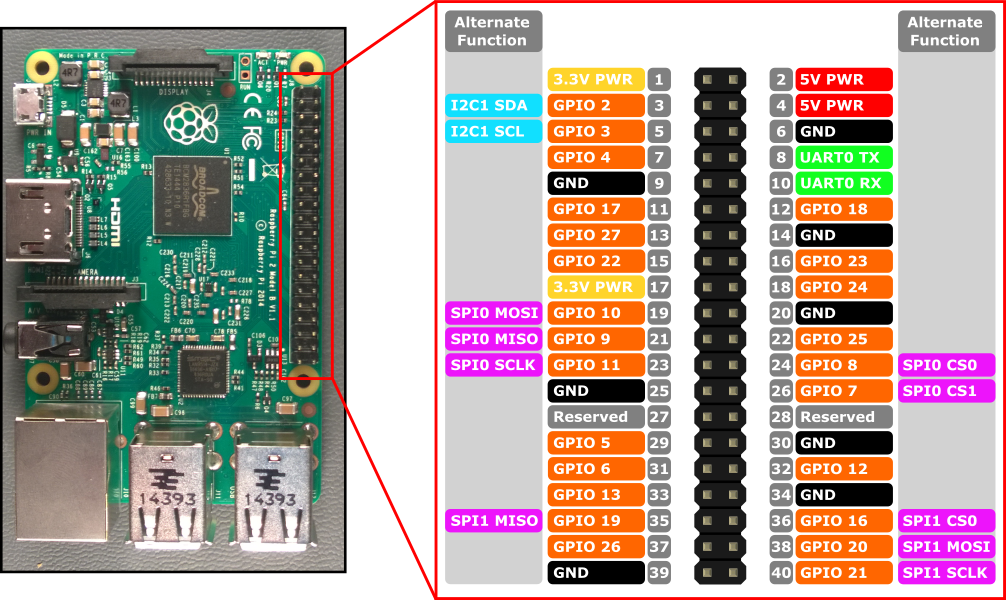
Before we do our binding we will bench test our GPIO. For this post we will be using a reed sensor. These sensors are simple, as there are two parts. One side is the sensor and the other is a magnet. When the magnet is nearby the sensor it will report a 1, otherwise it will be a 0. We will connect this sensor to GPIO 27 (the 7th pin down on the left, or pin 11). We will power it by connecting it to pin 1, which is 3.3v. Simply connect these pins to your breadboard and connect the ends of the reed sensor.
Open up a shell and we can verify that the GPIO ports are working correctly.
# Set up GPIO 27 and set to input
echo "27" > /sys/class/gpio/export
echo "in" > /sys/class/gpio/gpio27/direction
We’ve now setup our pin for reading. Let’s read the value
cat /sys/class/gpio/gpio27/value
> 0
If we touch the contact ends of our sensor, we should get a different value
cat /sys/class/gpio/gpio27/value
> 1
Afterwards, we should unexport our pin so other processes can use it:
echo "27" > /sys/class/gpio/unexport
We are now ready to bind this pin to openHAB.
Installing the GPIO Binding
Select the PaperUI by navigating to http://raspberrypi:8080/. The PaperUI for openHAB will someday in the future be full-featured enough to allow for effortless configurations for all openHAB entities. However, at the writing of this post the only thing it’s really useful for is installing Bindings. Click Add-ons and find the GPIO Binding. Click on the INSTALL button. We can now bind the GarageDoorClosedSensor item to our newly installed binding.
Binding to the Item
Accessing GPIO requires that the openhab user is in the GPIO POSIX group. Simply adding this user to the group with the command below
sudo adduser openhab gpio
Open the garage.items file (sudo -u openhab vim /etc/openhab2/items/garage.items) and modify the GarageDoorClosedSensor.
Contact GarageDoorClosedSensor "Garage door sensor is [%s]" <garagedoor> (GarageDoor) { gpio="pin:27" }
I had an issue with the GPIO binding. When I opened the log in /var/log/openhab2/openhab.log I saw the following error:
2017-02-04 03:42:57.995 [ERROR] [ab.binding.gpio.internal.GPIOBinding] - Error occured while creating backend object for item GarageDoorClosedSensor, exception: /sys/class/gpio/export
2017-02-04 03:57:53.747 [ERROR] [ab.binding.gpio.internal.GPIOBinding] - Error occured while creating backend object for item GarageDoorClosedSensor, exception: /sys/class/gpio/gpio27/active_low
This indicated to me that something had not released the GPIO pin I was using. I manually unexported it and restarted the openhab2 service with the following commands:
sudo su # get a root shell
echo "27" > /sys/class/gpio/unexport # unexport pin 27
exit # we no longer need root
sudo systemctl restart openhab2.service # restart the service
Alternatively, you can alter your Item declaration to include the force:yes option, which will forcefully take over the pin even if it is use. Use this if you don’t anticipate using this pin for another application at the same time.
Contact GarageDoorClosedSensor "Garage door sensor is [%s]" <garagedoor> (GarageDoor) { gpio="pin:27 force:yes" }
Verify
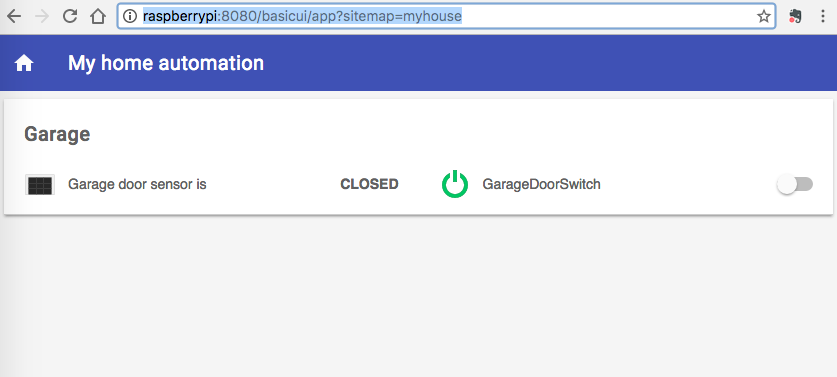
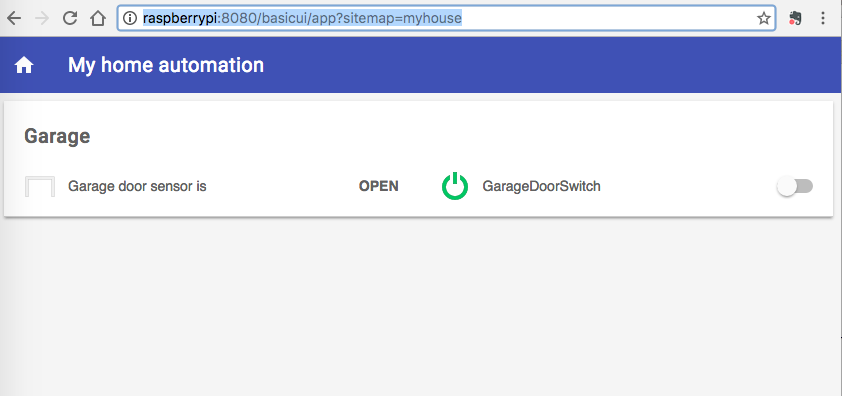
Now, when you navigate to http://raspberrypi:8080/basicui/app?sitemap=myhouse you should now see the updated Item. When applying to contact to the sensor it should now switch from CLOSED to OPEN
One issue here is that when the contact is near the sensor the value is CLOSED. This is technically correct, but it is the opposite of this for our garage door opener because when the door is closed the contact will be near the sensor. This is not a problem and we have two options, we can add a flag to our Item or perform a transformation. Adding the flag is easy, simply add the activelow:yes to the GPIO key/value pairs as follows:
Contact GarageDoorClosedSensor "Garage door sensor is [%s]" <garagedoor> (GarageDoor) { gpio="pin:27 force:yes activelow:yes" }
Inverting the mapping with a Transformation
While this may be overkill for this example we can map the values from the pins to aribtrary strings. First, we need to install the transformation add-on. Navigate to the PaperUI (http://raspberrypi:8080/) and click on the Add-ons tab. Click on the Transformations button. Finally, click Install on the Map Transformation add-on.
Now we need to define a map transformatin by creation a (you guessed it) a configuration file in the /etc/openhab2/transform directory. We will create a file called garageDoorSensor.map (sudo -u openhab vim /etc/openhab2/transform/garageDoorSensor.map) with the following content:
OPEN=closed
CLOSED=open
Next, we will reference this map in our garage.items file (sudo -u openhab vim /etc/openhab2/items/garage.items) and alter our GarageDoorClosedSensor item to the following
Contact GarageDoorClosedSensor "Garage door sensor is [MAP(garageDoorSensor.map):%s]" <garagedoor> (GarageDoor) { gpio="pin:27 force:yes"}
When navigating back to the myhouse Sitemap note that the states have been inverted and the values are now lowercase.
Congratulations! You’ve configured your first Binding and created your first Transformation!